基于Thymeleaf与Bootstrap的Web开发实例
在进行Web开发中,尽量使用前端开发工具包BootStrap,jQuery和SpringMVC框架,下面学习一个基于Thymeleaf模板引擎的Spring Boot Web应用。
1-创建Maven项目,并在pom.xml文件中添加相关依赖。
<?xml version="1.0" encoding="UTF-8"?>
<project xmlns="http://maven.apache/POM/4.0.0"
         xmlns:xsi="http://www.w3/2001/XMLSchema-instance"
         xsi:schemaLocation="http://maven.apache/POM/4.0.0 http://maven.apache/xsd/maven-4.0.0.xsd">
    <modelVersion>4.0.0</modelVersion>

    <groupId>org.example</groupId>
    <artifactId>Thymeleaf</artifactId>
    <version>1.0-SNAPSHOT</version>
    <parent>
        <!--配置SpringBoot的核心启动器-->
        <groupId>org.springframework.boot</groupId>
        <artifactId>spring-boot-starter-parent</artifactId>
        <version>2.1.4.RELEASE</version>
    </parent>
    <dependencies>
    <dependency>
        <!--添加starter模块-->
        <groupId>org.springframework.boot</groupId>
        <artifactId>spring-boot-starter-web</artifactId>
    </dependency>

    <dependency>
        <groupId>org.springframework.boot</groupId>
        <artifactId>spring-boot-starter-thymeleaf</artifactId>
    </dependency>
    </dependencies>

</project>
2-在src/main/java目录下创建com.model包,在该包中创建实体模型类Book,在该类中定义书的信息,设置构造器,访问方法和修改方法。
public class Book {
    String isbn  ;
    Double price ;
    String bname ;
    String publishing ;
    String author ;
    String picture ;
    public Book(String isbn, Double price, String bname, String publishing, String author, String picture) {
        this.isbn = isbn;
        this.price = price;
        this.bname = bname;
        this.publishing = publishing;
        this.author = author;
        this.picture = picture;
    }

    public String getIsbn() {
        return isbn;
    }

    public void setIsbn(String isbn) {
        this.isbn = isbn;
    }

    public Double getPrice() {
        return price;
    }

    public void setPrice(Double price) {
        this.price = price;
    }

    public String getBname() {
        return bname;
    }

    public void setBname(String bname) {
        this.bname = bname;
    }

    public String getPublishing() {
        return publishing;
    }

    public void setPublishing(String publishing) {
        this.publishing = publishing;
    }

    public String getAuthor() {
        return author;
    }

    public void setAuthor(String author) {
        this.author = author;
    }

    public String getPicture() {
        return picture;
    }

    public void setPicture(String picture) {
        this.picture = picture;
    }
}
3-在src/main/java目录下创建包com.controller,在该包中创建控制器类ThymeleafController。在该控制器类中实例化Book类的多个对象,并保存到集合ArrayList< Book >中,并暴露为模型数据,供视图页面获取。
import com.model.Book;
import org.springframework.stereotype.Controller;
import org.springframework.ui.Model;
import org.springframework.web.bind.annotation.RequestMapping;

import java.util.ArrayList;
import java.util.List;

@Controller
public class ThymeleafController {
    @RequestMapping("/")
    public String index(Model model){
        Book book1 = new Book("1234", 56.0, "Java实用教程", "清华大学出版社", "耿老师", "1.jpg") ;
        List<Book> books = new ArrayList<>() ;
        Book book2 = new Book("1245", 55.0, "JavaWeb开发从入门到实战", "清华大学出版社", "陈老师", "2.png") ;
        books.add(book2) ;
        Book book3 = new Book("1236", 55.5, "JavaEE框架开发从入门到实践", "清华大学出版社", "陈老师", "3.jpg") ;
        books.add(book3) ;
        model.addAttribute("aBook", book1) ;
        model.addAttribute("bBook", books) ;
        //使用Thymeleaf模板,将默认返回src/main/resources/templates/index.html
        return "index" ;
    }
}
4-添加静态图片和引入Bootstrap框架。在src/main/resources目录创建static目录,在该目录下创建images目录和css目录,images目录中放入三张图片,css中引入bootstrap。
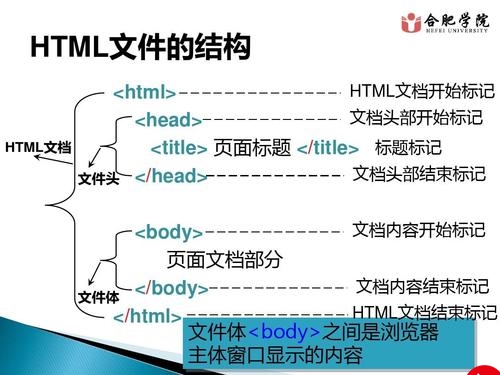
5-创建View视图页面。Tymeleadf模板默认将视图页面放在src/main/resources/templates目录下,因此在该目录下创建index.html视图页面,在该页面中使用Tymeleaf模板显示控制器类ThymeleafController中的model对象的数据。
<!DOCTYPE html>
<html lang="en" xmlns:th="http://www.w3/1999/xhtml">
<head>
    <meta charset="UTF-8">
    <title>Book</title>
    <link rel = "stylesheet" th:href = "@{css/bootstrap.min.css}"/>
    <link rel = "stylesheet" th:href = "@{css/bootstrap-theme.min.css}"/>
</head>
<body>
<!--面板-->
<div class = "panel panel-primary">
    <!--面板头部信息-->
    <div class = "page-header">
        <!--面板标题-->
        <h3 class = "panel-title">第一个基于Thymeleaf的模板引擎的SpringBoot Web应用</h3>
    </div>
</div>
<!--容器-->
<div class = "container">
    <div>
        <h4>图书列表</h4>
    </div>
<div class = "row">
    <!--col-md针对桌面显示器,col-sm针对平板-->
    <div class="col-md-4 col-sm-6">
        <a href = "">
            <img th:src = "'images/' +${aBook.picture}" alt="图书封面" style="height: 180px; width: 40%"/>
        </a>
        <!--caption容器中放置其它基本信息,例如标题,文本描述等-->
        <div class = "caption">
            <h4 th:text = ${aBook.bname}></h4>
            <p th:text = ${aBook.author}></p>
            <p th:text = "${aBook.isbn}"></p>
            <p th:text = ${aBook.price}></p>
            <p th:text = ${aBook.publishing}></p>
        </div>
    </div>
    <!--循环取出数据集合-->
    <div class = "col-md-4 col-sm-6" th:each = "book:${bBook}">
        <a href = "">
            <img th:src = "'images/' + ${book.picture}" alt="图片封面" style = "height: 180px; width: 40%"/>
        </a>
        <div class = "caption">
            <h4 th:text = "${book.bname}"></h4>
            <p th:text = "${book.author}"></p>
            <p th:text = "${book.isbn}"></p>
            <p th:text = "${book.price}"></p>
            <p th:text = "${book.publishing}"></p>
        </div>
    </div>
</div>
</div>
</body>
</html>
7.在src/nain/java下创建包com.test,在该包中编写启动类,运行启动类,然后 ,访问http://localhost:8080/
import org.springframework.boot.SpringApplication;
import org.springframework.boot.autoconfigure.SpringBootApplication;

@SpringBootApplication(scanBasePackages = {"com"})
public class TestApplication {
    public static void main(String[] args) {
        SpringApplication.run(TestApplication.class, args) ;
    }
}
8.运行结果如下:
更多推荐
基于Thymeleaf与Bootstrap的Web开发实例


发布评论